Exploring Commotion with Wireshark - a Tutorial
The program Wireshark, a network analyzer for Windows and Linux, allows you to monitor network traffic to see the actual packets of data being sent around you. This will allow us to look at the difference between encrypted and unencrypted traffic on a router running Commotion to see if encryption is working. This guide is written for Wireshark running on a Linux device, but can be applied to wireshark debugging on any compatible device.
Setting up your Devices
Before you start you should follow one of the Commotion Installing & Configuring guides to set up the device you will monitor. If you want to follow along make sure that you DON'T set a mesh encryption password just yet. We will need an unencrypted packet to help us find the encrypted packets that we create later.
NOTE: If you will be examining a linux computer running the commotion client these instructions should be run from a DIFFERENT COMPUTER. You can use wireshark to monitor your own device as well, but these instructions are about passively monitoring the airwaves. Following these instructions WILL interfere with your devices ability to mesh if used on the device running Commotion.
Before you get started monitoring wireless traffic you must prepare the radio on the computer running wireshark. These Debian based instructions should work on most Linux systems with only minor modification. If you want to copy and paste the following commands in your device copy the lines without the dollar sign. Replace <CHANNEL> with the channel the wireless device you will be monitoring is using for its mesh.
    $ sudo service network-manager stop
    $ sudo iwconfig wlan0 channel <CHANNEL>
    $ sudo ifconfig wlan0 down
    $ sudo iwconfig wlan0 mode Monitor
    $ sudo wireshark
Now that our radio is ready and wireshark is opened we need to configure it. To set your wireless interface to listen to all traffic, and not just traffic between it and devices it is talking to we need to set it to “monitor” the airwaves. Double click on wlan0 and check the "use monitor mode" box.
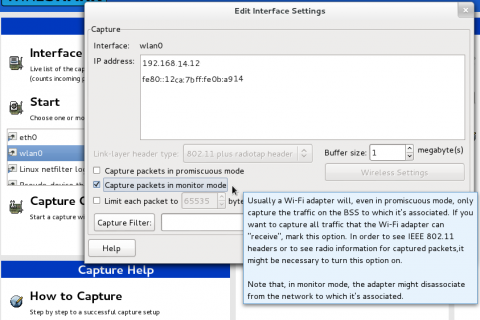
Click "OK" and then click on the start button in the main window to begin monitoring the wifi around you.
Monitoring Commotion Mesh Traffic
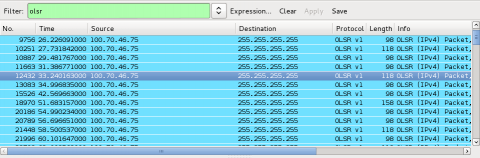
Commotion currently uses the mesh networking protocol OLSR to mesh. One of the many reasons I love Wireshark is because they have created a series of filters for various types of traffic. We will be using the OLSR filters to make sure we only see Commotion mesh traffic. To filter the packets you are seeing on the airwaves to only show OLSR Traffic you type olsr in the filter section. This will slow down the number of packets you see significantly. You will only see traffic that contains olsr packets sent by devices around you. This will look something like this...
Clicking on a line in this list will select a single packet of information. Once you click on one of these packets it will fill the bottom frame with information about that packet.
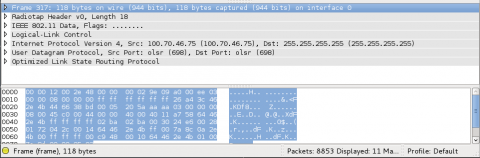
Each packet will be broken up into a series of expandable sections. There is a lot of data under these sections. For this post we will only be looking at the few important pieces of data we need to prove that encryption works. First, we need to make sure we are looking at our device, and not the dozens, if not hundreds, of other Commotion devices that are being put up in your neighborhood every day. The "IEEE 802.11 Data" section will hold information about the device that sent the message.
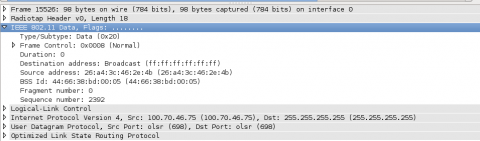
The "Source Address" value will be the MAC address of your router. If you connect to your router and run $ ifconfig on it you can compare the " HWaddr" of the mesh interfaces with this address. If they match, then the packet you are seeing was sent by your device. Make sure you write down the source information of your node here. We are going to need it later. You will also notice that the "Destination address" is set to "Broadcast (ff:ff:ff:ff:ff:ff)." OLSR messages are broadcast for any other mesh device to hear so they use a shared "Broadcast" address so they know where to look for OLSR messages.
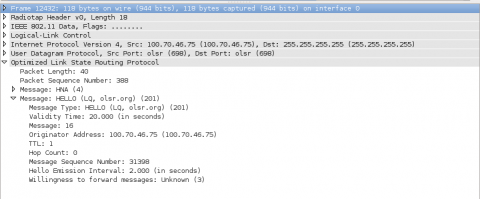
Lastly, lets look at the actual data that is being sent. The "Optimized Link State Routing Protocol" section contains the data that your router is sending to the mesh network. In this example it is sending a HELLO message that lets other mesh devices know it exists.
Looking at these packets we can see all the nodes in the area that are running OLSR without encryption. To see encrypted packets we need to turn on mesh encryption on your device. You can add a mesh encryption password on your routers menu under Basic Config -> Network Settings -> Mesh Network . I would show you a photo of it on my router, but I am in the middle of testing translation so it is half in french.
If you are still looking at wireshark you will see that all of a sudden your device's OLSR traffic stopped dead. The data that makes an olsr packet easily sortable by wireshark is now encrypted. Remove your olsr filter and click the clear button. Take the source address you captured earlier and see if you can find your device broadcasting a packet. You can use wlan.addr == SOURCE_ADDRESS with the MAC address you captured earlier in the filter bar to only show your router's packets. The reason you are using your source address instead of the ip address that was listed under source earlier is that the ipaddress is now also encrypted.
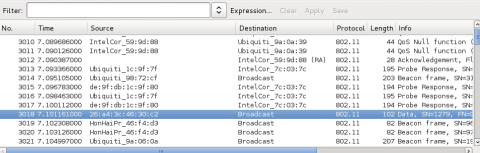
If you are also running an Access Point on your device you will see packets coming from your source address broadcasting invitations to join that access point. Make sure you are looking at a broadcast packet with a "Data" section within it. This will differentiate the OLSR packet from advertisements for the routers access point, shown below. By the way if you are not having fun yet you don't know how to live.

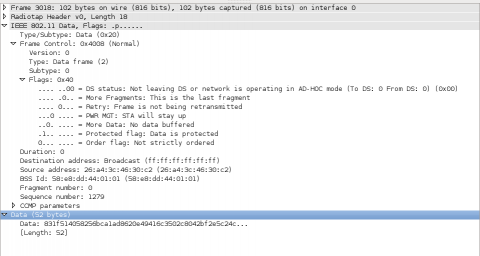
If you saved your old packet, or took a picture, you will notice that in the IEEE 802.11 Data -> Frame Control -> Flags sub-section that on our encrypted packet shows as .1.. .... = Protected flag: Data is protected. An un-encrypted packet shows as .0.. .... = Protected flag: Data is not protected. This bit of "header" information lets other devices know that the data below is encrypted.
As stated by the "protected flag" the encrypted packet's "Data" section is simply a long encrypted string and a value specifying its length. This is where the un-encrypted "header" information stops and the encrypted packet begins. All the data in the packet is encrypted as the string of gibberish you see below. Seeing this lets us be sure that our mesh network is actually encrypting the data it sends.
Wireshark can do much more than just show that you have encrypted your traffic. With wireshark and a few unencrypted mesh nodes you can watch the elaborate dance required to make mesh-networking work. If you add a gateway and a user to this you can even see what user data looks like over an encrypted vs. unencrypted mesh network. This is a journey for another day though. Before I leave you, lets get your wireless interface back to normal. First stop the scan and close wireshark down. Make sure you save your capture files if you want to look back at them later. Once it is closed down do the following.
    $ sudo ifconfig wlan0 down
    $ sudo iwconfig wlan0 mode Managed
    $ sudo ifconfig wlan0 up
    $ sudo service network-manager restart
I hope you enjoyed this little detour into examining you mesh device from the data it sends to the world. Please let us know if you want us to show you other mesh-network debugging techniques or concepts in our comments section below or over e-mail.